This will be a pretty technical post, so feel free to skip it if you're not interested in Perl coding and things of that nature.
When I started building my Accidental Terrorist Missionary Name Tag Creator, I knew I wanted to use the Perl interface to ImageMagick to overlay a name in bold white text onto the blank space on a name tag image like this one:
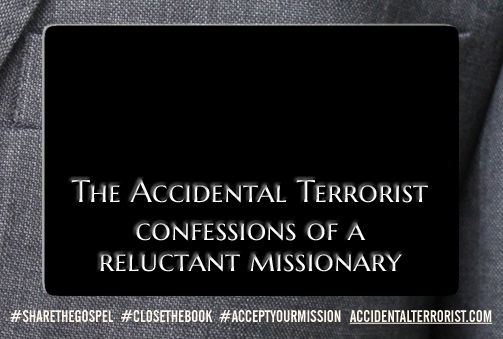
What's more, I wanted the name to look like it had actually been drilled out or stamped into the name tag, with maybe a slightly pebbled white surface to give things a nice feeling of texture.
I had used ImageMagick before for some simple applications, and I knew it was a very powerful graphics-processing package. However, it's also very arcane, without much in the way of user-friendly documentation. (Oh, there's plenty of documentation. It just helps to be fluent already in graphics-processing-ese to grok it.) Stack Overflow, to name just one forum, overflows with questions about how to do this or that with ImageMagick.
I scoured the web for an answer to what I thought was my very simple question about how to make an inner shadow, but I came up empty. Finally, all I could do was start playing around until I figured it out for myself.
I did figure it out, and I'll lay out my method below in case there's anyone else out there looking for an answer to the same question. I'm not claiming this is the best solution. In fact, I'm sure there's probably some fiendishly clever way to do this in ImageMagick with a single convoluted command. Me, though, I like to take things step by step so I can easily see what's happening at every point and why.
Having said that, my method is pretty simple, though it gets a little tricky. We'll start with the declarations, and we'll initialize a bunch of variables we'll need later (some of which we can futz around with to adjust our output):
#!/usr/bin/perl

use Image::Magick;

my $sourcefile  = 'image-magick-step-1.jpg';  # blank name tag image
my $texturefile = 'image-magick-step-2.jpg';  # pebbled texture image
my $targetfile  = 'image-magick-step-6.jpg';  # final composite image

my $name = 'ELDER HEISENBERG';  # text to print on name tag
my $font = 'AltGoth2.ttf';      # font face (TrueType font file)
my $size = 59;                  # font size

my $startx = 252;  # horizontal text position (centered)
my $starty = 94;   # vertical text position

my $offsetx = 0;  # horizontal shadow offset
my $offsety = 2;  # vertical shadow offset

my $radius  = 0;      # blur radius
my $sigma   = 1.5;    # blur sigma
my $opacity = '70%';  # shadow opacity
That's all pretty straightforward, I hope, though we'll get into exactly what all these variables are for below.
Next, we declare a couple of Image::Magick objects and load them with, respectively, the blank name tag graphic above and the pebbled texture graphic below:
my $nametag = Image::Magick->new;
$nametag->Read($sourcefile);

my $texture = Image::Magick->new;
$texture->Read($texturefile);

So far, so good. But before we actually try to print any text on either of these images, we need to gather some information about the text itself—specifically, how wide it will be when rendered:
(my $x_ppem, my $y_ppem, my $ascender, my $descender, my $width, my $height, my $max_advance) =
  $nametag->QueryFontMetrics(
	font      => $font,
	pointsize => $size,
	text      => $name,
);
QueryFontMetrics is a method of Image::Magick that, when passed some text descriptors, returns an array of stats about how that text will be rendered. The only return value we're interested in for our purposes here is $width, which will help us center the text properly.
Our variables $startx and $starty describe the point on the name tag around which we'll center the text. Knowing the width of text, we can easily calculate where the upper left corner will need to fall:
my $x = $startx - int($width / 2);
my $y = $starty;
If we wanted to center the text vertically as well, we could calculate that from the $height value, but in this case we only need to know where the top edge of the text will fall.
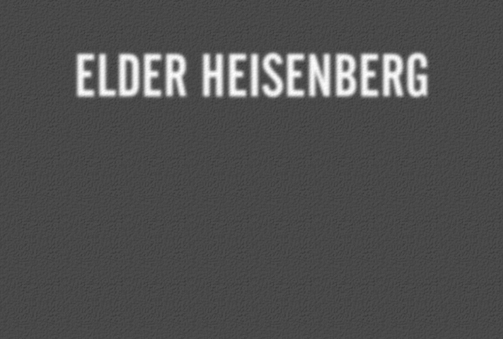
Now we start getting to the interesting stuff. Our next step is to construct a "mask," which is a grayscale image used as a filter when compositing one image onto another. The black parts of a mask will render the composited layer transparent, while the white parts will render it opaque. The levels of gray in between provide varying degrees of opacity.
I find it a little difficult to think of masks in those terms, though. It might be simpler to think of a mask as a stencil. You can lay your stencil down on the base layer of the image you want to composite, then sort of "spraypaint" your top layer through it.
You'll see what I mean after a couple more steps. For now, we're going to create our mask image by initializing a new Image::Magick object, filling it with black, and then printing our (properly positioned) text on it in white:
my $mask = Image::Magick->new;
$mask->Set( size => '503x339' );
$mask->ReadImage( 'canvas:black' );
$mask->Annotate(
	font      => $font,
	pointsize => $size,
	fill      => 'white',
	text      => $name,
	x         => $x,
	y         => $y,
	antialias => true,
);
The chunk of code above results in the following image:
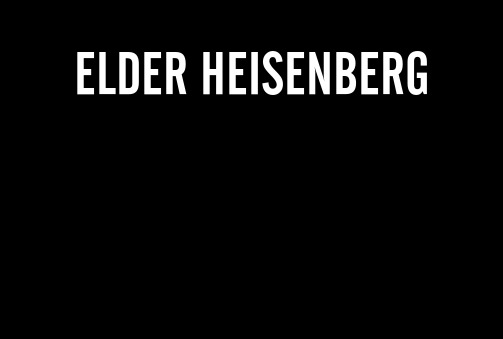
See, doesn't that look like a stencil? We'll be using this mask in our final step to spray bits of one image onto another while blocking out other bits.
Okay, now we're going to construct our shadow. This is what we'll eventually lay over our text to give it the 3D look we want. To create this shadow, we need to construct a new image that looks a lot like a mask but really isn't.
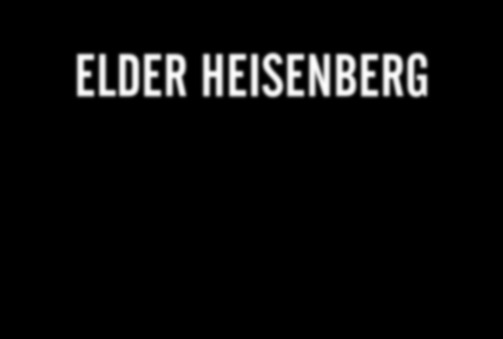
The process is very similar to making our mask above. We want our shadow to be shaped like our text, so we again build an image with white text on a black background (though we could just as easily use a brown or purple background, or anything else we feel like):
my $shadow = Image::Magick->new;
$shadow->Set( size => '503x339' );
$shadow->ReadImage( 'canvas:black' );
$shadow->Annotate(
	font      => $font,
	pointsize => $size,
	fill      => 'white',
	text      => $name,
	x         => $x + $offsetx,
	y         => $y + $offsety,
	antialias => true,
);
$shadow->Blur(
	radius => $radius,
	sigma  => $sigma,
);
But this time we do two things differently. We offset the text a little, in this case moving it down vertically by two pixels. Then we apply a blur effect to the image, giving us the following result:
Like I said, while this looks very similar to our mask image, it's not exactly the same sort of thing. What we're going to do with it—and this is where the magic really starts to happen—is layer a translucent version of it on top of our texture image. The code to do this is very simple:
$texture->Composite(
	image   => $shadow,
	compose => 'Dissolve',
	opacity => $opacity,
);
And that gives us the following image:
We now have a composite image that looks like bright fuzzy letters projected onto a pebbled charcoal wall. The fact that the texture is only faintly visible is the result of our $opacity parameter, which we could easily up or down, depending on the effect we wanted.
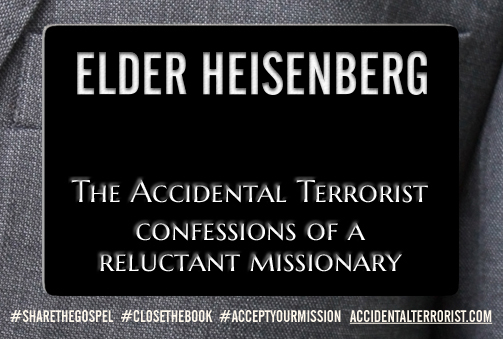
Now we're ready for the final step. We take that stencil from way back and spray our composite shadow layer through it onto our original blank name tag:
$nametag->Composite(
image => $texture,
mask => $mask,
);
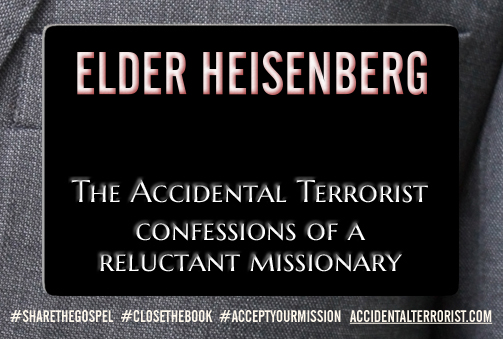
$nametag->Write($targetfile);
We write the result to the file system, and voilà! Here's our final image, looking quite fine:
There's no doubt a way to do this in fewer steps, but what we have is certainly acceptable for my purposes. And not all that difficult.
If you try this code out with your own images, I'd suggest spending time playing around with the values of the initial parameters, and with different colors for the shadow layer. You might be surprised what you end up with!